Your Step by Step Guide on How to Start Your Own Shopify Store
So you’ve been thinking about setting up an online business. But as many successful online shop owners can tell you, the first step will always seem like the hardest.
It can be daunting not knowing where to begin when trying to set up your online store. But worry not, here we will go through a step-by-step process that carefully takes you through the ropes of setting up your Shopify store.
We will take a look at how to build your homepage, product listings, set up shipping, and many more.
By the end of this guide, you will be well on your way to launching your store.
Let’s get straight into it, shall we?
Starting With The Free Trial
As a first-timer on Shopify, it’s best to avoid spending your money right away. So go for the free trial. Shopify’s 14-day free trial allows you ample time to set up your shop as you learn the platform.
You will need to choose a name for your online business which becomes the URL e.g. Storename.myshopify.com. While you do not get to change the name of the business once you go live, you can opt to pay for a new domain i.e. Yourstore.com.
The most important thing is to get started and deal with the custom domain matters later on.
Here are the four things that you need before you start your online business.
- Product
- Business Name
- Logo
- Photographs
The Product
you need to identify which product to sell before you can even think about starting your online Shopify store. They can be physical products, services, and digital products.
Business Name
We mentioned this earlier. It depends on the type of products you are selling and the kind of image you want to portray in the minds of your clients. It can thus be playful and fun or exquisite and classy. Make sure that the name you choose is unique to your business. You can verify the name via sites such as Namechk.
The Logo
Coupled with the name, you will also need a logo. Here you can work with a good graphic designer who you can find on job sites like Fiverr and Upwork.
Product Photos
Images of the products can be a huge determinant of how fast your merchandise will move. So make sure to source the expertise of a professional photographer. White backgrounds are often ideal. If you are looking to save on cash, you can take great-looking photos with a good smartphone. Just make sure they look professional.
Now that you have the basics, let’s get onto the Shopify store.
Creating A Product Listing
While this might seem like a step that should come later on in the process, it is ideal to start your Shopify store by adding the products you will be selling.
This is because you will design the entire look of your Shopify store around these products.
In your new Shopify account, go to Products> Add Products.
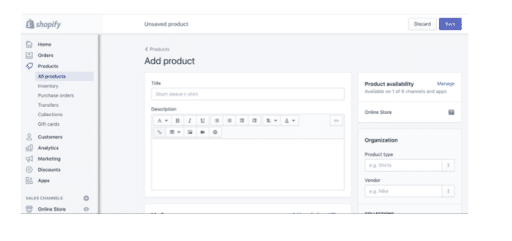
Product Title And Description
The title is what customers will type when searching for products. Ensure to keep it short, simple, and precise. It tells the customer what you are selling and what they can expect.
The product description is any relevant information about the products. This includes specifications such as size, color, and weight. You can use either text or visuals such as infographics to explain to the customer what the product is all about.
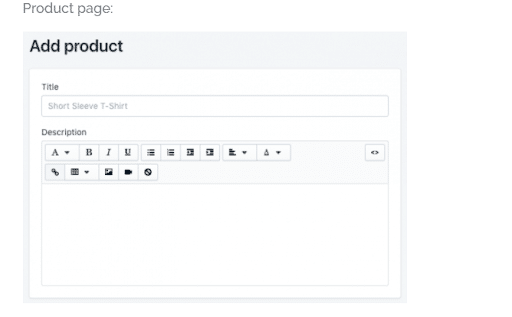
Not sure how to write your product description? Visit other Shopify stores and see what they’ve put in their product description to get an idea.
As you write your product description, make it easy to scan through so customers can quickly get the information they need and decide whether they will make a purchase or not.
Add Photos And Media
Next, find the media section on your Shopify product page. Here you can add any relevant media such as photos and images as well as short videos and GIFs.
Some tips to keep in mind is to always use high-quality photos and images. Help the customer imagine using your product.
Also, ensure to use the same aspect ratio in all your images. This simply means that they should all be the same width and length.
Add In The Price
This is the price you will be selling your product for. It is the price that your customers will be paying for your product.
Note that you should be careful when setting the price. Cheap pricing doesn’t mean that customers will buy more. Sometimes customers use price to judge the quality of a product. Don’t be afraid to set a premium price for a premium product.

You also have the cost per item option. This section lets you add the cost of the item which later lets you easily see the profits.
Inventory Section
It is critical for every Shopify store owner to keep track of his or her inventory, how much has been shipped, and how much is remaining. This allows you to determine how much stock to order.
There are several terms that you will need to be familiar with when tracking inventory:
- Bar Codes – you can use this option when planning on adding bar codes to your items for easier inventory management. If you are however selling your products or services, you can leave this option open.
- SKU – this one stands for stock keeping unit. This makes it much easier for you to track specific products as well as different types and variants of a product.
- Quantity – this is the total number of inventory that you are currently holding. The number will show up here.

You will find the continue selling when out of stock option. You can turn this option on if it only takes a short time to access more inventory.
However, you can turn this option off and mark “Sold out” if it takes longer to access more stock.
Shipping Section
Here you will add the different shipping details. You will also add information that automatically calculates the different shipping details.
If you are selling physical products, then you will need to check “this is a physical product”.

Other information that you will need to fill in include:
- Weight
- Customs information (thus is when planning to sell your products internationally. Here you can fill in your country).
You can also find the harmonized system code for your type of product. This is used by border officials to help them classify your product.
As for the shipping costs, you will fill them in later.
Variants
If you are planning on selling different variants of the same products, this one is for you. Often the obvious route to take for many Shopify store owners is to add each product as a different and individual product.
However, with the variants option, you can add the different variants of the same products. For instance, if your product is the same but may feature different flavors, colors, sizes, and prices.
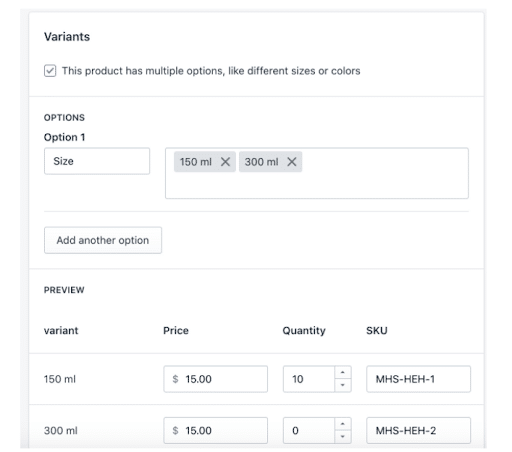
Once you click on the “this product has multiple options, like different sizes and colors, you will need to click refresh. This will prompt you to add information on the media, shipping, pricing, and inventory section that we covered above.
Organization Section
This section allows you to arrange and group your products to make it easier for your customers when going through the catalog.
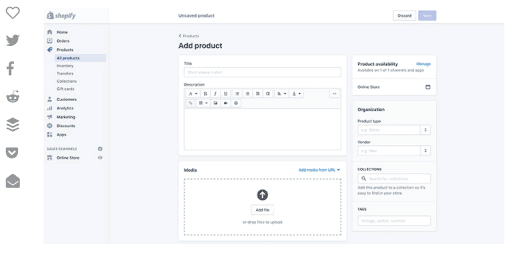
This requires you to understand what each label means.
Product availability allows you to pick from various sales channels such as Amazon or Facebook to list your products. Always ensure your product is available on the online store. This allows it to be visible.
Product type lets you choose a category for the different types of products you sell.
The vendor simply refers to the manufacturer or the wholesaler.
Tags refer to specific keywords which you can add to your product. It makes it easier for customers to find your product in the search bar.
Collection lets you curate your products based on the audience. For instance, you could sell men’s watches or women’s bracelets. It makes it easier for customers when searching for their items.
Search Engine Listing Preview
This section allows you to add the keywords which customers are using on search engines such as Google to find your type of products.
It makes it easier for your products to appear on search engines. You can use tools such as Ubersuggest to find out what keywords customers are using on search engines.
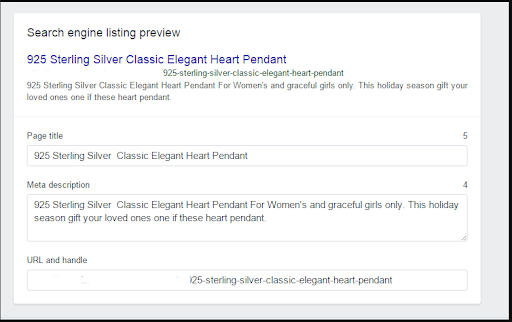
You will find title and description sections where you will add in the keywords.
Write the title of the product using the keywords in the title section. Keep it short and simple.
While writing the description of your product, also add in more keywords here.
There is also the URL and handle section. Add in a keyword here.
Hit save and preview to see how it all turns out. Note that you can always make changes later.
Collections
We have managed to list a few of the products that we plan to sell. Now it’s time to organize them into collections.
Go to Product>Collections.
This allows us to group products according to our audience. For instance, best storybooks for children, best accessories for men, etc.
This section also allows you to curate the items you want to put on sale or link products in your navigations or home page.
This section also has a title, description, URL, and handle.
You can add the title and description based on how you would like to meet the visitor. For instance, you can put “fitness watches for the adventurous”.
Creating Key Pages For Your Shopify Store
It’s one thing to have your products listed but you also need to have other pages to help your visitors better understand your business.
The main pages you need to consider and create include the About Us page, the FAQs page, Contacts page, and Policy pages.
You can also add more pages such as a blog section if you like.
We will however focus on the above 4 pages.
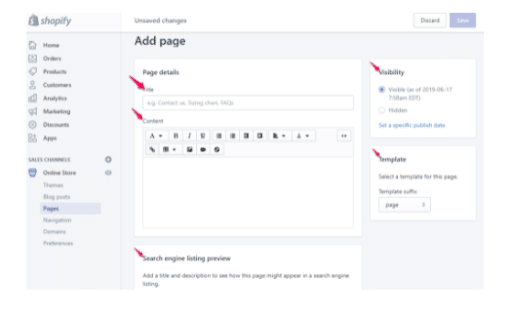
Go to Online store>Pages.
About Us Page
This page will help visitors find out more about who you are as a seller and your type of business.
It helps build trust and can even be the deciding factor on whether or not a visitor makes a purchase.
You can add text or even a short descriptive video on the about us page.
Recall the process we followed on your products page on the search engine listings preview. Do something similar with the about us page where you make customizations on how you want the URL to appear on search engines.
Contact Page
This page allows customers to reach out to you in case they need support. Creating a contact us page on Shopify is simple. Simply access the templates section and click on contact templates.
You will then get a form in which you will fill in your contact details. Note that you can also add live chat support here.

Policy Pages
Every online business will require a policy page. This allows customers to understand what to expect from your business and how you conduct it.
A policy page is also useful in helping protect your business in case of a customer dispute.
Go to Settings> Legal.
Here you will generate templates that you can then customize according to the nature of your business and the local laws.
Here you will access the return policy, shipping policy, terms of service, and privacy policy.
Customizing Your Shopify Store
We’ve managed to add products to our Shopify store and create some useful pages. Now it’s time to design the look and feel of your Shopify store.
Go to Online Stores>Themes.
Let’s take a closer look at themes.
Themes
There are many different themes to choose from for your Shopify store. Some are free while others are paid themes.
Also, note there are different types of themes based on the industry or type of business and the size of your business catalog.
There are also different styles for each theme that you fancy. This allows you to make your store appear unique and achieve the feel that you want.
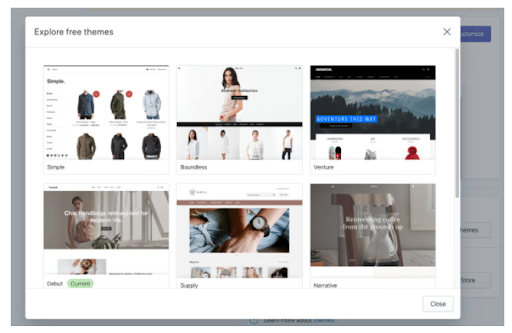
When choosing your theme, ensure it works well with the features that you want in your store. For instance a search bar on the home page.
Never pick a theme based on your favorite colors. Remember that for whichever theme you choose, you can always customize the fonts and colors later.
The Homepage
Each theme that you choose will allow you to customize, change and even hide different sections. This allows you to create the ideal feel and message for the visitor.
The homepage is where many site visitors will land first.
There are several factors to thus keep in mind when designing the homepage for your store.
Firstly, keep first-time visitors in mind. You want to grab their attention and relay the right information about your business quickly and efficiently.
Second, ensure the homepage is simple to navigate and that visitors can easily access other pages such as the about us page or blog page.
Remember the goal is to do business, so make the buying process simple with just a few steps.
Always keep in mind that you can revisit the homepage design in case you want to add a new element or update the look.
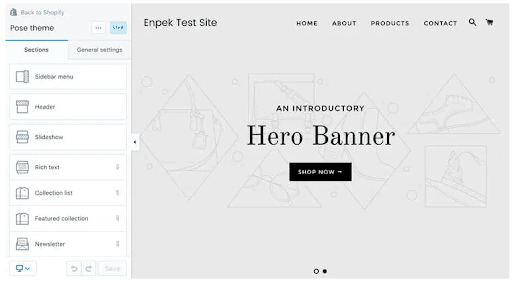
Some of the design features that you have access to include a slideshow, image with text, newsletter, and featured products.
The Navigation Menus
You will need to customize your navigation menus. Let’s start with the Header. This is where visitors will access other pages.
Here you have three main options:
- The main menu will appear at the top of the pages. This will contain the most essential actions with a basis on shopping, of course. You can also create submenus or drop-down menus when you need to add other options.
- Footer menu. This is located at the bottom of the page. Here you will add all other non-essential links that are not always a priority but still important to the visitor. They can access these pages when they need to.
- The search bar. You can place this also at the upper part of your page to allow visitors to search for items or pages that they want directly.

Color, theme, fonts, and typography settings
Access the online store editor where you will find the themes settings tab. Here you have the opportunity to choose the different colors.
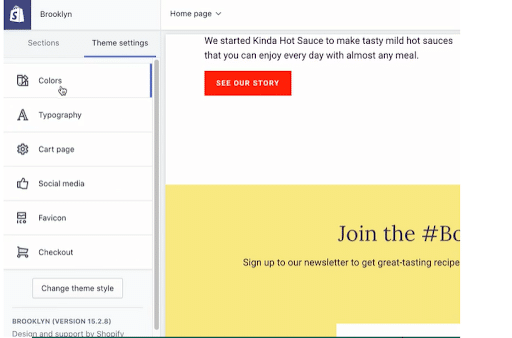
When choosing colors, consider what you find attractive and if this works well with your type of product. For instance, if you sell foodstuffs, colors such as pink and yellow can work well.
Also, consider how different colors make people feel. Yellow, for example, makes people feel safe and warm.
Using contrast is a great way to highlight certain information or aspects on your page.
Let’s talk about typography.
Ensure to use simple and few fonts. You can have one font for the header, another for the accent text, and another for the body text.
You can play around with different fonts to find out which best works with the theme and the colors.
Customizing Your Checkout
While still on your theme settings, you will also able to customize the look of your checkout. Here you can add your logo.
You can also set how your checkout works by going to Settings>Checkout.
Some of the settings include:
- Customer accounts – this is if you would like for your customers to create an account at checkout.
- Form options – this lets you choose whether to allow first names or company names during checkout or to keep these hidden.
- Customer contacts – here you can allow customers to choose how they would prefer to be contacted i.e. via email or SMS message.
- Order processing – here you will find options that make it simple for customers to make an offer. Think of adding an extra confirmation step or enable autocomplete for addresses.
- Abandoned checkouts – customers will often abandon their order after reaching the checkout process. Here you can add a setting to automatically send a reminder email after a certain duration of time such as 10 hours.
- Email marketing – by turning this option on, you can allow customers to fill in their email addresses during checkout. This makes it possible and easy to build an email list to which you will market.

Note that in case you are in doubt about anything, you can always give priority to those options that make it easy for customers to make a purchase.
Shipping Setup
One of the most challenging parts about setting up an e-commerce business is shipping. There are a number of variables to consider such as carrier raters, size and weight of the products, destinations, cost of packaging and your profit.
4 things you will need to figure out before shipping your products.
- Free Shipping
- Real time Carrier Rates
- Charging A Flat Rate
- Local Pickup And Delivery
Free Shipping
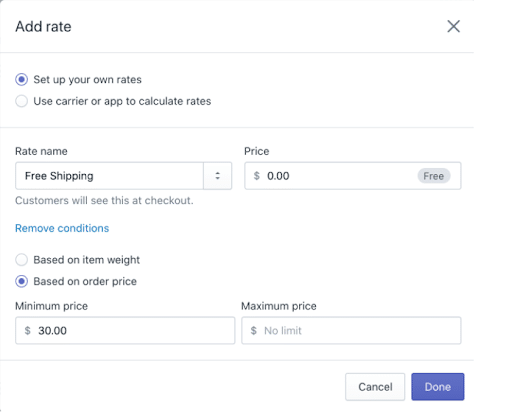
this is one strategy that can help pull in customers. You may decide to offer free shipping for orders above a certain point. What to always keep in mind is you need to ensure you factor the shipping cost to the retail price.
Real time Carrier Rates
With Shopify you can generate live pricing and shipping costs thanks to the real time integration with Canada post and USPS. Customers can thus choose the pricing that they prefer.
Charging A Flat Rate
If you plan on selling items that come in similar sizes and weights, then charging a flat rate for your shipping costs can prove highly convenient. Both you and customers can predict the prices much easily.
Local Pickup/Local delivery
This option allows you to let local customers pick up their orders at specific destination and pickup locations.
Shipping Zones
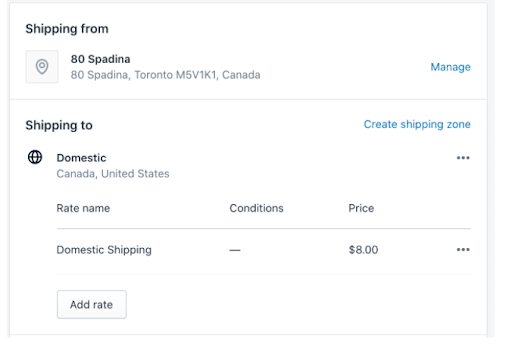
You can set up shipping by going to Settings > Shipping in your Shopify account. Here you can add in your settings and zones. This means choosing your rates for customers buying from different locations around the world.
Conditional Shipping Rates
Locate the Add Rate button which you can use to create shipping conditions. For instance, you can set rates for certain locations or set to increase rates by a certain margin if the weight of the order reaches a certain threshold.
Real-Time Shipping Rates
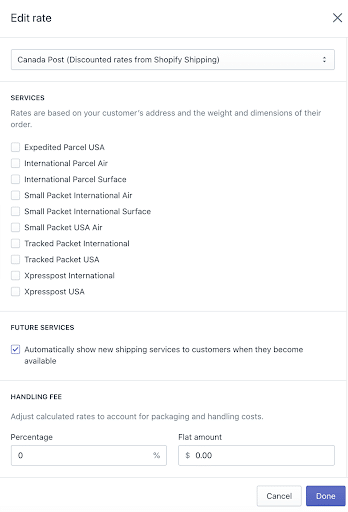
After you’ve added the product dimensions and package dimensions on the Settings > Shipping page, the details will be used to calculate real-time shipping rates. This allows customers to choose their own rate at checkout.
You may also decide to include a handling fee to cater for the extra costs of shipping such as packaging time. This rate will be on top of the courier rates.
Setting Up The Taxes
You are expected to pay your taxes whenever a customer purchases goods or services from your Shopify store.
The great thing with Shopify is you can easily and automatically calculate your taxes using default tax rates from around the world. Note, however, that it is also best to consult an expert to ensure that you are paying the correct taxes. Otherwise, you may find that you are violating some tax regulations and rules.
Some regions have specific tax requirements. Simply go to Settings > Taxes. You can hereby apply override or edit the default rates.
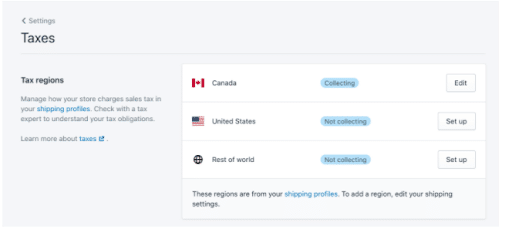
If you want to find out just how much taxes you have collected, go to Analytics>Reports.
Remember that Shopify will not file your taxes for you. You need to ensure that you do this before the required date.
Payment Gateways And Payouts
This step involves setting up how your customers will make payments for the products they want and how you will receive the cash.
Shopify accepts all major forms of payments. This is provided you operate the business in the supported countries and also that the business is not considered a prohibited business.
It is quick and easy to activate Shopify payments. Simply go to Settings > Payments and set up your preferred payment provider.
You can also provide customers with additional payment options such as PayPal.
Ensure you have the required information while setting up Shopify payments. This will mainly include bank information and business details.
You can also manage your settings and choose options such as:
Offer the products for sale in different currencies. This option makes it simple for you to change the currency to the customer’s currency. Go to Settings > General.
You can add in another level of security with the Extra Fraud Prevention toggle.
You can set your payout duration. For instance, you can choose to receive your payments, weekly, monthly, or daily.
You can pick which payment options you would like to offer customers e.g. shop pay, apple pay, or credit cards
Finally, you can customize and set how your Shopify store and business will appear in the customer’s bank statement. This makes the business easily recognizable in the customer’s financial statements such as credit card statements.
Getting Ready To Launch Your Shopify Store
At this point, it is possible to launch your Shopify store. If you are in a hurry to let customers in and start marketing your store, go to Online Store > Preferences and disable the password protection.
However, there are some steps that you can still perform to make sure that your online store is in the best position to accept business. It involves creating the best first impression and placing it in a perfect position for marketing.
- Add A Custom Domain
- Add Relevant Sales Channels
Add A Custom Domain
Recall the default domain that you received during the account set-up process. With the custom domain, you will replace the default URL.
Shopify allows you to buy a custom domain/web address directly. Simply go to Online store>Domain. Alternatively, you may also opt to purchase a domain from a different registrar and then connect this to your Shopify store.
Adding Relevant Sales Channels
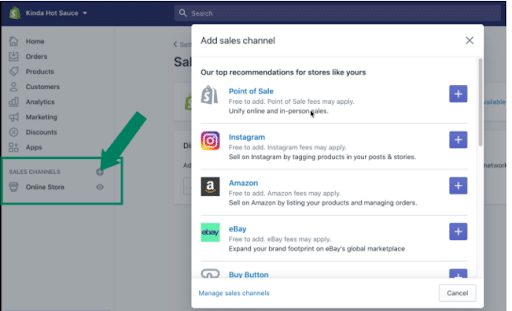
Shopify allows you to connect the products that you have listed to multiple sales channels. This allows you to reach out to customers wherever they are. As you do this, you will still be able to track your inventory, as you will receive reporting from different channels to your Shopify account.
Don’t worry if the sales channels seem a bit too many. Simply connect to a few of the options available and add to them later. Keep in mind also that it is not all the sales channels that will be useful for your business. Pick the ones which your audience uses.
Sales Channels To Include In Your Shopify Store
- Social Media/Networks
- Market Places
- Shopify POS
- Google Shopping
- Call To Actions (Buy Buttons)
Social Media
You can market and sell your products through your Facebook page, Instagram, Pinterest, and many more.
Market Places
These include Amazon and eBay.
Shopify POS
Shopify’s point of sale solution allows you to accept in-person payments. If you have a physical store, you can sync physical sales with your online sales.
Google Channel
This is a tool that allows you to 1) list your products in the Shopping Tab for Google for free, and 2) Run paid Smart Shopping campaigns to promote products across Google.
Buy Buttons
This option allows you to install a buy button on your website or blog. Customers are thus able to make purchases from your other website or blog.
To add a sales channel, click the + button located next to each sales channel.
Email Notifications
Email notifications are a great way to alert customers about order placement, order confirmation, and status updates. Shopify provides automated email and SMS notifications that are ready to use.
Go to Settings > Notifications and edit here. Note that this process is optional and you do not need to enable these.
How To Set Up Your Shopify Online Business For Marketing
The marketing strategy you use will be suited to your type of business. Regardless of this fact, it is important to have the right fundamentals set up to make marketing your online business that much more efficient.
Let’s take a look at some important marketing concepts and fundamentals that you need to set up to ensure you have a steady stream of traffic to your business.
Analytics
Shopify allows you access to data that is critical to the success of your business. Go to Analytics > Reports. Here you will be able to see your traffic from the various sales channels. You are also able to determine which channels are most successful as well as your overall conversion rate.
Shopify reports will also provide useful information which you can use to improve sales.
Keep in mind that you also have the option of integrating Google Analytics.
Facebook Pixel
Facebook pixel is an intelligent algorithm that studies how your customers interact with your brand. It will consider their buying patterns, the pages they visit the most, and the products they view when visiting your online store.
Facebook pixel lets you personalize how you advertise to your customers. If you have ever visited an online store but didn’t make a purchase only to receive ads on other websites of the products you were viewing or similar products, then you have an idea of how Facebook pixel works.
If you want to advertise your products on Instagram or Facebook, then it’s a good idea to set up a Facebook pixel.
Note that when setting up a Facebook pixel, you will need a Facebook account or Instagram account. You will also require an ad account.
Search Engine Optimization
Many online shoppers will search for products on search engines such as Google. Here they will find online businesses similar to yours and click through to find what they want. If they are satisfied with the product, they will go ahead and make the purchase.
It pays therefore to ensure that your online business is listed on Google. Keep in mind that this type of traffic will not occur overnight. It is a process that takes time. Done the right way, however, you stand to reap huge rewards.
You can help search engines such as Google to rank your Shopify store through a process called search engine optimization. We first became familiar with SEO when setting up product pages.
There are many keyword search tools such as Keyword Surfer and Ubersuggest which you can use to see how many times customers are searching for a specific keyword including the type of searches that happen around that keyword.
Search engines work by providing the best and most relevant results to the customer. So always search for keywords that are most relevant to your business and products.
Need help getting people to your website? Check out our SEO Guide for DIY help, and our SEO services page to see if we can do it for you.
Launching Your Shopify Store
You have now managed to complete all the major steps and are now ready to launch your store. Remember your store is not perfect and there is always room for improvement. You can always go back to the steps above and make tweaks and changes to improve your store.
Go to Settings > Preferences and remove your password. This now tells the world that you are open for business.
That said, let’s take a look at how you can better drive traffic to your business.
How To Start Getting Sales
The first thing to note is that to be able to make your first sale, you will need to drive traffic to your Shopify store.
Here we will take a look at a marketing checklist that you can use to get traffic.
While we mentioned that you can tweak changes on your store to make it even better, this is not the most important thing as far as driving traffic goes even while it pays to improve your store.
Your number one goal is to expose your business to customers. Once people start interacting with your store, you will be able to access real data which you will then use to improve your marketing and ultimately get more sales.
Using Shopify reports, you can see how people are interacting with your brand. Are they finding your prices too high and are they relating and interested in your products?
As a new entrepreneur, you typically have more time than money, and marketing your business can seem with a shoe string budget can feel like being stuck between a rock and hard place.
Go For The Free Sources Of Traffic First
- Free Traffic Sources
- Personal Networks
- Online Communities
- Existing Audiences
- Optimize Your Marketing Strategy
(Paid Sources of Traffic - Google Ads and Social Media Ads)
One of the major benefits of these types of traffic is they are easy to create. They mainly center on sharing your store with relevant online communities and networks.
You can start with a discount code. This arouses curiosity in the minds of potential customers and entices them to check out your store. For instance, you can offer a $10 discount in exchange for customer emails.
Secondly, you can add your Shopify store’s URL to your profiles online. This may include your LinkedIn bios or Twitter bios.
Thirdly, avoid frequent messages that are low quality as this will only be interpreted as spam. Your overall goal should be to add value.
Take Advantage Of Personal Networks
Many first-time eCommerce store owners will get their first sales from their personal networks. Don’t be shy to send the word out to your Instagram, Facebook, Twitter, and Pinterest followers.
Granted, getting your first sale this way can never be compared to the satisfaction of getting a complete stranger to purchase your products. However, it is an excellent way to start letting people know about your business. What’s more, you will also get early feedback which you can use to convince new visitors to make a purchase.
Become A Part Of Online Communities
Another excellent way to get the word out about the existence of your business is to join online groups. Whether it’s Reddit or Facebook groups, you can drop a link perhaps with a discount code.
This can help drive a significant amount of traffic to your store.
Groups often comprise people with similar interests. If you can, therefore, find groups that are interested in the type of products you are selling, you can convince them to take a look at your Shopify store and find the products that they need.
Become an active member of such groups and when you have built a decent following, send them a link.
Reaching Out To Existing Audiences - Tap Into Others’ Databases
It is one thing to get the word out yourself about your Shopify store. It is even better if others also do it for you.
By reaching out to others’ content such as blogs, product reviews, and news, you not only spread the word out about your business but also build credibility and trust among the customers.
One question you should always ask yourself when you are pitching to others’ content is “how will it benefit them?”
Contacting Bloggers
Bloggers are always looking for new and interesting topics and ideas to write about. If you believe you have an interesting story or product, then try and pitch this to publishers and they will be happy to write about it.
When pitching to bloggers, ensure that their publications are in your niche.
There are a number of ways that you can connect with a blogger.
- Submitting a guest post – this is where you offer to share your knowledge and expertise on a certain topic. The author of the blog will retain credibility but offers to put on your Shopify store link in the blog.
- Offer free products - you can offer the blogger a sample of your product for free. In exchange, you can ask them to review the product.
Search Out Partnerships
Being a smart businessman or businesswoman is also about building strategic partnerships. The idea here is to put your products in front of someone else’s audience or customers.
The idea here is to search out other businesses that sell products that are in the same niche but yet you are not in direct competition. This will require a bit of skill on your part but the rewards can be great.
Reach Out To Influencers
You don’t have to be a big brand to work with influencers. Social media has made it possible to find out about influencers who already have a decent-sized fan base that would be interested in your type of product.
You can find these influences on any social media platform from Facebook to YouTube. You can reach out to them and negotiate a deal. Remember that the deal needs to benefit the influencer as well as you.
You may agree to offer the influencer a certain percentage of the profits if a follower buys your products.
Optimize Your Marketing Strategy
If you have done any of the steps above, you should already see a spike in traffic and even possibly some sales.
This step involves looking at the results for each marketing strategy and using the feedback for improvement. You can use Shopify reports or Google Analytics.
Such information will provide insight into why customers behave as they do. You can then make certain tweaks and changes to improve conversion rates.
For instance, if there is a high bounce rate, it is possible that you are attracting low-quality traffic or your site takes a long time to load.
If you are noticing a spike in traffic yet nobody is adding products to the shopping cart, you may have marketed to the wrong audience.
If customers are reaching the shopping cart but are not proceeding with the purchase then you may need to consider improving your shipping policy.
Let’s take a closer look at how to properly analyze your traffic
How To Analyze Traffic To Improve Conversion Rate
The first time you start marketing and driving traffic to your Shopify store, you may notice that even while the traffic may number in the hundreds and even thousands, you are still not able to make sales.
Customers base their buying decisions on many factors. They could be as small as having the right color on your buy button or as large as not attracting the right traffic in the first place.
Let’s take a look at some key areas where you can improve to increase conversation rates.
How Is Your Navigation Menu?
It is easy to think that first-time customers interact with the business website first. However, this is actually not the case. The first thing that site visitors will notice is the navigation menus and how easy they are to use.
Shoppers will use the navigation menus to access other pages such as the product pages, contact page, about us page, and FAQs.
The navigation menu will mainly include the header navigation and the footer navigation.
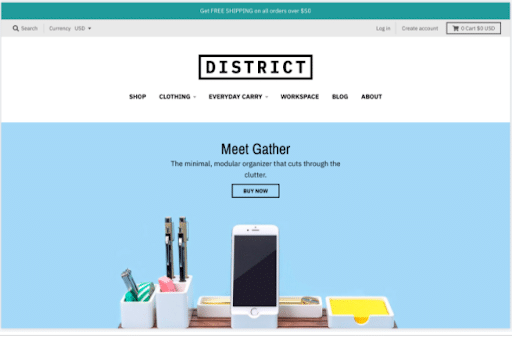
The header navigation will contain all the important links that shoppers require such as links to products and important pages.
The footer navigation on the other hand is located at the bottom of the screen and will contain information such as terms and conditions, policy page, privacy, and reviews. This is information that the shopper will be interested in if they want to learn more about the business.
Always ensure that the navigation menus are simple and intuitive to use. Go through the website yourself and notice how you feel about the navigation. If it is cumbersome, shoppers will notice this as well.
Does Your Brand Look Professional?
The homepage is where you communicate your brand. It is critical therefore that you send the correct messages to your Shopify store visitors.
First off, the images need to look professional. Always ensure that you use top-quality images and visuals. If you cannot take quality images and upload them yourself, consider issuing stock images and videos.

Secondly, the text should be in line with the images as well. Communicate professionally. Use the right font that works with your brand and theme. This goes for the colors as well.
Also, make sure that you have a professionally done logo. You can consider using Shopify’s free logo maker.
If shoppers feel like the colors, the text, the font, and the visual are not in sync, they will have a hard time trusting the business.
Do You Have A Compelling Call To Action?
Many successful online businesses have reaped the rewards of a good call to action. This compels visitors to hit the checkout button and make a purchase.
A banner that appears on the homepage as soon as the customer clicks your Shopify store will grab their attention. You can then combine the call to action with the banner.
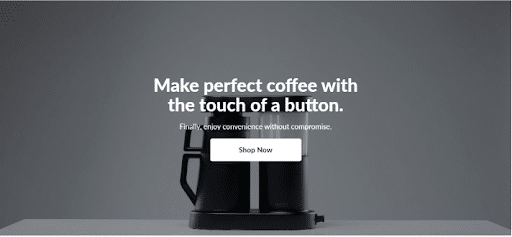
Take note not to include too much information here as the shopper may feel confused. If you have extra information that you need to share such as free shipping, you can show this at the topmost part of your screen via an announcement bar.
The Website Copy
The copy on your Shopify store can be the difference between increasing the conversion rate and an increase in the bounce rate.
Shoppers expect quality whenever they are going through your website. Any typo can quickly cause them to become suspicious of the quality of your products.
Always ensure to proofread your web copy and even hire the services of a proofreader. You can even ask friends or family to go through the copy and spot any typos.
Keep the copy short and straight to the point. Remember that online shoppers have short attention spans and do not want to spend time reading too much text.
Is Your Website Mobile-Friendly?
The majority of online shoppers make their purchases via their mobile devices. It pays therefore if your site looks equally as good and be as easy to navigate via mobile phones as with the desktop version.
Seek the opinion of friends and family on what they think about your website on their phones. This will give you insight into how shoppers think about your website.
If it is not optimized for mobile, you may be losing out on a significant portion of the market.
Building Customer Trust
One of the main reasons you are unable to make sales even while having traffic in the thousands could come down to customer trust.
Granted, it is challenging to build trust when you have zero sales and no feedback, but not impossible.
Here are a few options you may need to implement to build customer trust and boost sales.
Install Live Chat
The live chat feature lets you talk to customers when they visit your website. You can answer any questions they have as they go through the site. It is also an excellent way to build confidence and trust.
You can make use of Shopify chat and Facebook messenger to mention a few.
You can even program some live chats to send automated messages and responses.
Build Connections Using Social Media
There is a high chance your customers will want to take a look at your social media presence. Social media can be one of the deciding factors on whether a customer commits to purchase and becomes a regular or not.
Regularly update your social media presence. While there are many social media platforms, you do not have to be present on all of them. Simply update your presence in the platforms that your customers are also found.
Making regular updates proves to your customers that your business is active. This is a chance to broadcast the latest products and deals. You can gather a following to which you can then market to.
User-Generated Content
This point goes hand-in-hand with the last one. Sourcing user-generated content can be an excellent way to convince site visitors to make a purchase.
After all, they can see that others customers are making purchases and are happy with the purchase. If you don’t have customer images, you may consider offering some products to your friends or family. They can take images and reviews which you can then use to build customer trust.
Ensure A Personal Element
People do not want to purchase products from large brands. They instead prefer to buy from people.
Your business should therefore offer its personal story. This creates a connection with your audience making them feel like they are part of your journey.
You can then ask them to take action.
Analyze Your Data
Now that you have taken all the necessary steps and set up your business in a way that appeals to customers, you will need to analyze data and reports. You can access this information from Google Analytics or through the Shopify dashboard.
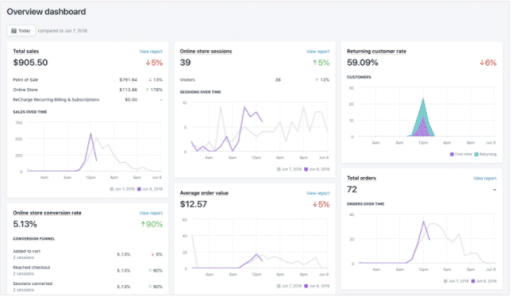
You can find information on your conversion rate, the number or percentage of customers who are making a purchase. However, it is best to break the shopping process into stages and evaluate these individually.
In this way, you can find where customers are spending the most time and where they are struggling. You can then fix these issues for a much better customer experience.
Why Shoppers May Not Be Adding Products To Their Shopping Cart
Let’s look at an example of why customers may be visiting your site but are not adding products to their cart.
Reasons shoppers don’t add products to their carts on your website:
- Making the add to cart button more visible by increasing the size of the button and changing the color.
- Reducing product copy that could otherwise push the add to cart button down the screen making it harder to spot.
- Increasing the variety of product photos for visitors to go through.
- Making use of formatting options like bolding and bulleting to make product copy easier to scan through.
- Making sure that your add to cart button is equally as easy to spot both on the desktop version and mobile version of your website.
What If Shoppers Abandon Cart?
Go to abandoned checkouts in your Shopify dashboard and see whether customers are abandoning cart. If you find that the majority of your customers are pressing the add to cart button but do not proceed with checkout, then there are a number of things you can do to reduce the number of abandoned carts.
Start by adding a buy now button on your product page. This lets customers skip the many purchasing processes and go directly to checkout if they are ready to buy.
Add a discount code to the abandoned cart emails. This will help you recover some of the sales and improve your conversion rate.
Send abandoned cart emails and persuade customers to complete their purchase.
How Is Your Price And Payment System?
You may have realized that customers are easily and efficiently getting from the product page to the checkout stage only to not proceed with the purchase.
One of the factors that could stop customers from completing the purchase is your payment or pricing system.
Here are a few things that you may want to consider;
- Analyze and evaluate your pricing to make sure is more attractive to the customers
- Provide more payment options to make it more convenient for customers to make payments such as PayPal, Google Pay, and Apple Pay.
- Provide free shipping for orders above a certain threshold to encourage buying
- Offer discount codes for first-time customers. You can do this via apps such as Privy.
Always remember that if you can make the checkout process extremely easy, you can drastically increase your conversion rates.
Continuously Marketing To Website Visitors
First-time visitors will not always be ready to make the purchase. After all, they may not know much about your business and whether or not they should trust you.
They may need regular visits before they finally make up their mind. This is why it is important to continuously market to site visitors.
By using information such as product pages most visited, you can use this to tailor targeted advertisements.
You can retarget customers with paid ads, or even send out a discount code to shoppers who abandoned carts.
Continuously advertising and marketing to your site visitors will keep you in their mind when they are finally ready to make a purchase.
How To Boost Conversion Rate
By evaluating the data, you will be able to spot areas where sales are leaking. By closing these loopholes you will be able to improve your conversion rate.
However, you may notice that up to this point, you are still unable to boost the conversion rate. There are several questions and factors to consider:
- Have you focused on a niche?
- Are you selling your products to the right audience
- Are you nurturing customers through emails marketing
- Is the traffic you are attracting high quality
Remember that your Shopify store is a work in progress with always areas to improve. Doing regular evaluation is the key to turning your Shopify store into a thriving online business.
Advertise: Spending Money To Make Money
The most effective way to drive traffic to your store is by using paid advertising. Often these utilize the pay per click method.
Note that when choosing a channel for paid advertising, be sure to pick those that expose you to potential customers and those who are interested in what you are selling.
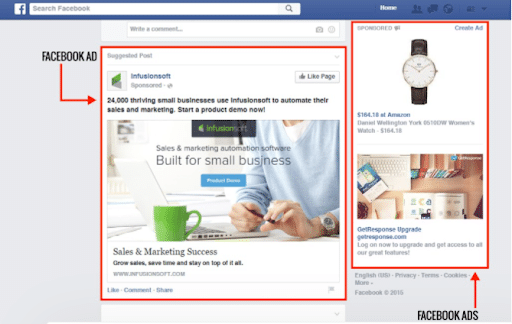
Facebook Advertising
Facebook is the world’s most popular social media platform. It has a diverse range of users who differ in age, gender, income, and ethnicity.
Very often, you can find a target audience via Facebook making it the perfect channel for advertising. You can do this by finding the interest of users via previous pages that they have liked.

Instagram Advertising
Instagram is popular with millennials. It is one of the best social media platforms for influencer marketing. One way to take advantage of Instagram is to use your ads on others’ feeds.
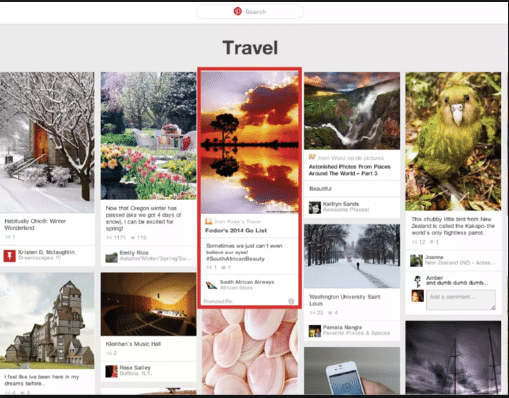
Pinterest Advertising
While Pinterest doesn’t always come first in mind when thinking about social media marketing, one of its main strong points is that it has a clearly defined audience.
It’s not hard to find a target audience based on interests. Many Pinterest users are female with disposable income.
Google Ads
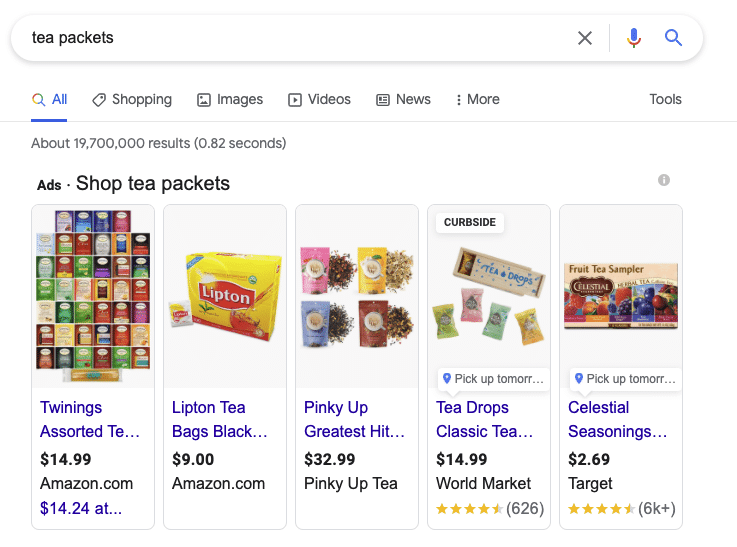
When buyers are searching for products online, the first place that they go to is Google. With Google ads, you can have your Shopify store listed on the first page for certain specific keywords.
It displays your product images in a more eCommerce-friendly style. The downside with Google ads is that they can be quite complicated for some users. In this case, you may consider hiring the services of an expert Shopify expert to do it for you.

0 Comments